After playing with Boblight for a while it looks like all the cool kids are moving to Hyerion, it has a GUI config editor, low CPU and a few more configuration options.
Hyperion documentation is also very strong, but I thought I might spell it out incase people are struggling a bit.
The developers are highly active to respond and help wherever they are.
Originally I moved from Boblight to Hyperion with a lightpack, I then added a second lightpack and ended up with a cable management mess, gaps in the LEDs and just a desire to get a bit better matching with the LEDs to screen output, rather than the 9 LED strips that are treated as 1 LED each (total of 10 LEDs). The WS2801 LEDs allows them to be individually addressed.
Here’s how to do it….
Shopping List:
- 1 Raspberry Pi
- 1 WS2801 LED strip
- 1 Decent amped 5V Power brick
- Connectors
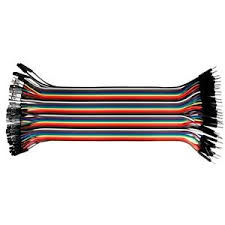
- Breadboard Jumpers
If you have some cash left feel free to 
1. Buy all the bits
2. Install Raspbmc
3. Install and Configure Hyperion
4. Cutting the LEDS
5. Placing the lights on your TV
1 – Buy all the bits
WS2801 strip
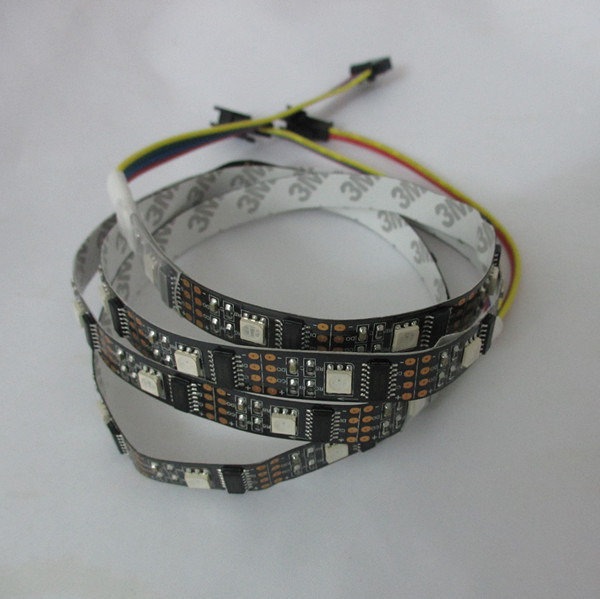
- Black PCB background
- 5050 LEDs
- Had a power brick jack already on the LED strip
Unfortunately I dont really want to linkto the ebay seller or the item as I cant really reccomend the exact one I bought because it has the dreaded first LED blue issue and also one of the LEDs in the strip has a loose solder and one blue in one tri led doesnt always fire. The other thing is the black PCB was for aesthetics, but the tape on the back is still white and I wanted the black as I have taped onto a clear part of the bezel on my Samsung TV.
So…… go source the LEDs from wherever you want, as long as they are WS2801, they will work (hyperion also supports other chips, but this is what I am using)
If you cant find one with a power brick jack, get one of these
Decent Amped 5V Power Brick

Connectors

Breadboard Jumpers
2 – Plug in the Bits
2 – Install Raspbmc
See http://www.raspbmc.com/download/ for instructions.
3 – Install and Configure Hyperion
Note: if you have boblight installed, you should disable it as the Boblight and Hyperion will fight with each other….
- Install WinSCP – Download Link
- Install PuTTy – Download Link
Ok so now we need to set up root access on the Pi this is needed (well, there are other ways but it makes it easier) so we can copy the config file to the \etc location on the Pi. First we need to find out the Pi’s IP address
- On the Pi go to Settings -> System Info
- Note the IP address down
Next we need to SSH to the Pi and set root access
- Follow this guide to establish SSH access for the first time
- Follow this guide to set up root access
Now we can install Hyperion as root
- SSH into your Pi as root
- type:
apt-get update type:apt-get install libqtcore4 libqtgui4 libqt4-network libusb-1.0-0 libprotobuf7 ca-certificatestype: wget -N https://raw.github.com/tvdzwan/hyperion/master/bin/install_hyperion.shtype sh ./install_hyperion.sh
Now you need a configuration file. You need a few things before you can copy the file to the Pi. Download HyperCon from this link and read the wiki to configure it. The example file on this page is for these LEDs. You should be able to calculate how many LEDs are on your strip, but if your not sure, just use a small number to start with – remember this is just for testing at this stage
Remember where you save the hyperion.config.json file.
Now we can copy the config file
- Connect to your pi using WinSCP, logging in as root and using the IP address you used above.
- navigate to /etc
- copy the hyperion.config.json file from above to this location
Reboot your Pi and you should be good to go for testing.
4 – Cutting the LEDs
Now you should have a working 5 meter strip of LEDs, its time to get cutting – work out where you want the cable start to be (for mine it was bottom left), them measure up the strip to the next corner and cut in between the copper contacts with a pair of scissors. Mark the piece you just cut with the TV edge eg LEFT. repeat this for the each corner of the TV.
Next, connect your pieces back together by either the solderless joiners, or what I did was cut the ends off the joiners (because they didnt fit properly) and solder the wires on to rejoin them.
Once done, put the LEDs on the back of your TV with blue tac so you can test how it looks.
5 – Tuning the Colours
To help calibrate, I created some videos to use. The first three are pure red, pure green and pure blue, and then the last one has some movement of color with some pauses to help you with hscan and vscan on each strip (thanks to a YouTube publisher for this).
Feel free to download these, add them to your movie library and play them to see your results (and have a laugh at what the movie scraper uses from IMDB)
Link to calibration file (95mb)
You can pause and check the settings – go back into HyperCon, and make some adjustments to the colors, gamma and value settings. Many hours will be spent in here – I suggest you make any changes in small increments. Once you’ve make a change:
- Create the configuration file
- Using WinSCP, replace the existing config file
- Using PuTTY, log in and enter the command “restart hyperion”
Do this over and over again until you are happy with the color matching. I recommend you also use things like Kids cartoons, dark scenes in movies and of course the avatar fire scene (and upload it at crappy quality to YouTube like everyone else).
6 – Final Mounting
Once you have done all the testing you can bear, its just a case of removing the blue tac, and sticking the LEDs on the back of the TV with the 3M tape, hide the cables and sit back and enjoy your lights.
Hope this helps!
feel free to comment (and donate) if you found this useful.

Pingback: HOW TO: Raspberry Pi, RaspBMC, Hyperion and a WS2801 strip | A.J.'s Playground
Hello I am getting an error on the hyperion installation.
ERROR: The certificate of `raw.github.com’ is not trusted.
ERROR: The certificate of `raw.github.com’ hasn’t got a known issuer.
what can i do?
Sounds like a local trust issue – perhaps try posting your question on this forum http://forum.stmlabs.com/showthread.php?tid=11053&pid=97331#pid97331
can you tell me how you got around the “dreaded first LED blue issue” as i seem to have the same problem
Unfortunately I haven’t! I am thinking it is possibly a shielding issue and am thinking of actually turning off the first led as a workaround
Andrew I would like to run ws2801 led strips around my projector screen about 10m, I was thinking of powering 5m on side and a separate pwr supply on the other side, then tie both in to a raspberry pie. Is this possible?
When I got my 5m strand the seller said I could power it from both sides so I would check with the seller or manufacturer. You could also put power in 1/2 way down or get a power brick with enuff amperage to power the whole run – good luck!
Hello, please supply what I need to RGB WS2801? Sometimes write 12V http://www.ebay.com/itm/5M-48-LEDs-16-Pixels-M-DC-12V-WS2801-RGB-LED-Strip-IP67-Waterproof-White-PCB-/310880305945?pt=US_Car_Lighting&hash=item4861e90319
and 5V http://www.ebay.com/itm/5M-Nonwaterproof-WS2801-5050-Dream-Color-RGB-LED-Strip-with-WS2801-IC-5V-32LED-m-/331069796676?pt=US_Car_Lighting&hash=item4d154c3144
else again, as it then? Thank you for your response.
Hi you should get your shopping list from here https://ajpawelski.wordpress.com/how-to-raspberry-pi-raspbmc-hyperion-and-a-ws2801-strip-2/. You don’t want 12v lights
Great article, thanks a bunch for sharing! My setup is mounted and working, but I’m not very happy with the color reproduction, even though I’ve spent some time tweaking the config. It seems like when I watch a video, I only get tons of blue, and a little bit of green and even less red and no colors in-between. Perhaps you could go into more detail about the art/science of tuning in the colors correctly? Also, could you post a link to your current config json so I can see the depth of your customizations?
I spent a lot of time and got some good advice from the devs on color matching and still I didn’t think I had it quite right – then I fired up my android tablet and using the Hyperion remote app I could change the gamma on the fly, pausing videos in trouble spots and tweaking – then noting the values and committing them to the config – I now have it spot on and took no time at all in the end!
Maybe your RGB channels are swapped. Try to modify your hyperion.config.file from “rgb” to the different options (e.g. “rbg”, “bgr” etc.). Try the constant-commands:
hyperion-remote -c red
hyperion-remote -c green
hyperion-remote -c blue
via ssh/putty.
Hi Andrew, I can get hyperion to do the rainbow color test, then nothing else. Is there a video grabber in the pi or do I need something else. Thanks
Thanks for the great write-up – one question: I have a 70″ TV and will need the full 5m length of LED’s.. My TV is wall mounted, so the power/HDMI cables are run through the wall. I know that the length of wires for power (and CLK+DAT wires) to the LED strip should be kept as short as possible. Do I need to put my raspberry pi equipment directly behind my TV to keep the wires as short as possible, or could I keep the raspberry pi setup (and 5v 10amp power supply) in my entertainment cabinet and run the wiring through the wall (about a 7-8ft length of wires) ? Thanks!
Great question and yes the clk and data cables are going to be your issue. I have the same setup – wall mounted and cables through the wall with cabinet below. What I used for my cables were the breadboard jumpers and just kept joining them together before running them through the wall until I found I was getting timing and flashing issues. I managed it just with my setup and also ran an extension for the power pack cable which was no issue on length. This method allows you to get about 20cm at a time. I found twisting the cables then electric tape shielding helped a bit too. I also added a ferrite core, but this is really for interference rather than timing.
I hope this helps.
hi, i am getting error 4 not found when trying to install the wget http….. part with putty. says no response, any help? Thanks
Hi what you have written doesn’t really make sense perhaps reword with the full commands etc
Hi, when installing Hyperion as root, step 4 –
type: wget -N https://raw.github.com/tvdzwan/hyperion/master/bin/install_hyperion.s
I get error 404. Not found. It says there is no response from where it’s trying to access the file.
Everything up to this point is fine.
Thanks
Kyle
Ah I think I see the prob try adding an h on the end
wget -N https://raw.github.com/tvdzwan/hyperion/master/bin/install_hyperion.sh
Instructions were good. But my blue and red are swapped and I have no clue how to fix it Any ideas on how to do an override.
Yep change the rgb byte order from rgb to bgr
Pingback: Anonymous
Sorry I only speak english
I am experiencing an issue where in brighter/faster scenes, the LED’s randomly flash purple. What would be the cause of this? It’s like a purple strobe flicker that only happens where the LED’s are whiter. Thoughts?
Could be a clock issue – try shortening cable lengths or shielding. Another easy thing to try is add a ferrite core incase of interference
Wow! That was the problem! I was originally going to run wire through the wall, I just cut the length down to about 12″ and it fixed the problem. I’ll mount the RaspPi on the back of the tv right next to the led connection. Thanks for your help!
Shouldn’t need to be that short! Mine are thru the wall and about 1.2 or 1.5 meters perhaps try shielding or ferrite (easy to get from an old VGA cable) if you want to lengthen
Are you willing to post/share your configuration settings?
Sure but will be different for everyone…. How many LEDs do you have
47 on top, 27 on sides
Hi, Could you post the config file you’re using? I know the led quantities will be different, but the color transformations should be similar. It would help me a lot in order to get the color transformation correctly tuned. Thanks!
It will drive you mad trying to hand modify the config. I spend days of time changing values, saving, restarting services and then seeing the results. Do you have an android device? If so get the free app Hyperion remote and that allows you to adjust on the fly then when you are happy write the values into the config to keep. I had colours tuned in about 30 mins and haven’t chNged them since
Will try the app, thanks for the tip!
How did that go?
how are you writing the values to the config file?
Read from android app and modify via winscp
I’m thinking of getting this kit from eBay: http://www.ebay.com/itm/90x-RGB-Leds-strip-Light-kit-LightPack-Clone-TV-backlight-usb-Ambilight-XBMC/141348087958
What I don’t understand is how the main lightpack ‘box’ connects to the Pi. Can anyone clear that up for me?
Thanks,
Sam
You will get a mini USB to USB A cable that just plugs in from the main lightpack box to one of the pi USB ports
Perfect, thanks much for the swift reply
hyperion should not light on the menu wehere can i switch it off?(sorry for that bad english :-))
There is an option for that in the conf file also available option in hypercon
would this work on my custom htpc running openelec and not my pi??
It’s linux based don’t see why not – the USB value might be different
Hey
I’m having a problem I got it working fine a month later it stopped working only the first 5 ish LEDs light up random flashing different colours I tried a fresh install and now the first 5 LEDs just stay a stable colour.
When I try to change config file nothing happens, when I type the test command to all red something changes to its like half responding
Anyone have any idea why?
Please help struggling with this
Did u do the august raspbmc update?
yeah it did update, could it be from the update?
I had same issue – it’s to do with voltage setting in firmware for spi
Use popcornmix file and instructions from this then reboot
https://github.com/tvdzwan/hyperion/issues/136
thanks ill give it a shot 🙂 n let you know how i go
Yep it’s quick to do – please report back on the result
im not an very tech davy i normally follow tutorials I’m assuming your referring to this part of the thread
“””””””
The firmware shouldn’t do anything with GPIO pins it doesn’t use (like SPI).
It is possible since gpioman that they are left in a different initial state.
The attributes of gpio I can think of are:
input/output/alt function
pull up/pull down/no pulling
drive strength
I would expect the firmware to leave unused gpio as inputs with no pulling.
You can set drive strength with Wiring Pi (setPadDrive).
Okay, I’ve just checked and it looks like drive strength for GPIO 10/11 used to be 8mA, but is now 2mA which could cause your problem.
Can you try adding this file to boot partition (alongside start.elf)
https://dl.dropboxusercontent.com/u/3669512/temp/dt-blob.bin
“””””
when it says the last part adding the file to boot partition alongside the start.elf I’m not sure where that is
is it the root of the sd card when i put it into a computer?
okay so i copied the file to the sd card started it up again and its working responding to xbmc woot woot thanks. but the LEDs are not working entirely around the screen its more like half, bottom corner to top corner. it might be from my config file ill try adjusting that and let you know how i go
thanks so much 🙂
i fixed the config file works perfect thank you 🙂
Glad to help
Hi Andrew. Thanks for the turorial. I can’t wait until all my ordered parts arrive. Found a small typo under the “Now we can install Hyperion as root”- section: The address from which hyperion should be downloaded misses an “h” at the end. Best regards from Germany.
Thanks – have fixed good luck and report back how you go!
Hey Andrew, the parts finally arrived and now I am trying to put everything together..
but I am already stuck at the “part 2 – plug in the bits”.
( I am a complete lay in terms of electronics)
I bought male to female jumper wires (as on your picture). This means, when I put the female part of the wire on the GPIO-pin of the Pi I have the male part left to put into my LED-String. Unfortunately the “Input” of my LEDs has a “male” connector. Shall I cut the wires and solder them to a female to female version?
Are you sure you have the correct end of the led strip? Also some strips come with gender benders
You may even be able to fashion your own gender benders from some of the other male ends of the jumpers
Soldering is always an option but check this stuff first
I now checked everything and it was the right end of the strip. This means, I had to convert my male to female jumpers to female to female (did this by cutting and twirling).
Now I have a flickering-issue. LEDs flicker all the time. Thy stop flickering, if I sent a constant color via the hyperion app or putty. But when I decrease the brightness via the app, they start flickering again.
I am getting crazy. Maybe a “ground” problem?
any ideas to verify or solve this?
thx
Read my reply to the previous poster – this could be your problem too
Thanks for your quick support Andrew. But I am using raspbmc – not openelec. Unfortuantely this didnt solve my problem :(.
Any further ideas?
Maybe I should try openelec instead of raspbmc to see, if its a raspbmc-issue….
I’m using Raspbmc as well and it fixed my issue. It’s a firmware fix rather than OS
hey there aj!
thanks for your wonderful tutorial. i just want to know how to wire the ws2801 to the RPI model B.
i have found out that my wires from the 2801 are as following (ordered here http://www.aliexpress.com/item/Free-shipping-50pcs-string-12mm-WS2801-led-pixel-module-IP66-DC5V-input-0-3W-full-color/855281354.html)
RED WIRE: DC5V input +
WHITE WIRE: DATA
GREEN WIRE: CLOCK
BLUE: Ground
no i found another tutorial claiming that i shall connect like this:
GND to GND
5V to input 5V
SCLK input CLK (gpio10?)
MOSI input DIN (gpio11?)
is that right?

so i just follow that boblight image connection diagram
can i just connect it like this to my RPI and everything works or is it recommended to wire it different?
thank you 🙂
*gunther
you need to connect the 4 pins to the right pins on the GPIO – 5v on the wrong pin is bad the png link you sent shows the correct pin outs.
Hey
I wonder if it’s possible to use WS8201 48LEDs/m 12V if I use a higher V and A power supply? Is this possible with the raspberry B+?
I want the best possible led light and details. And I have a 58″ TV btw.
Not sure sorry – i kbow the pi is 5v perhaps post on the hyperion forum
Hi,
Yes it’s possible.
I ordered a DC12v led strip by mistake and had to use it.
You have to use 2 differents power supplies (DC12v). One for the led strip and one for the raspi (DC5v).
Hey. Thanks for the tutorial. I have only one problem. Red light is blue on the leds an blue light is red. Can you help me?
In hypercon there is a led order default is RGB – sounds like you want BGR
Is there a ios App like Hyperion to use the raspberry Pi as mood light? real_Napster1
There is a ios app that you can use for changibg colors that might so what you want. Search hyperion in the app store
hey, I am building the ambilight using this video: https://www.youtube.com/watch?v=kf2WNVrerck, but it does not work, maybe you can help me?
Sure I suggest you read my article
Yes, I read your article and wanted to build it this way but I cant install hyperion. It says that there is an issue or something.
You would have to give me a bit more info like errors, and your hardware
I completed this project some time ago and everything was working perfectly. A few weeks ago I had a power outage and when I turned everything back on the HDMI input no longer worked. The app still works correctly so I can control the backlight with my phone, but when it tries to read the HDMI signal it just lights up like a pastel rainbow and stays the same. Any ideas on what might be wrong?
So when you use hyperion remote app it works? Have you tried saving your config file and reinstalling hyperion?
My case: Raspberry Noob… Raspberry Pi 2 with 1.8A PSU; 55x LED ws2801 strip with 2A 5V PSU; Fresh copy of OpenElec 5.0.3; Connected GPIO 19 to data and 23 to clock on the strip, Pi’s pin 6 (GND) to LED strip GND PSU. Installed Hyperion as above. Created a json as mentioned and updated the path. Reboot; Result: only first led lights up. If i disconnect de GND pin the 3 first led blinks with random colors. If i put again the GND on the Pi, the 3 led stop blinking and maintain a certain color. No clue of what is happening…
Try putting this in the root of SD card
https://dl.dropboxusercontent.com/u/3669512/temp/dt-blob.bin hopefully magically works
Did you really connected the LED strip to the correct GPIO pins? Most pictures about wiring shows old Raspberry Pi version with smaller GPIO (like this https://raw.githubusercontent.com/wiki/tvdzwan/hyperion/hardware_ws2801_connection.png). The correct wiring for B+ and Pi 2 is this: http://data.designspark.info/uploads/images/53bc258dc6c0425cb44870b50ab30621.
B+ and pi2 have an extended GPIO But the pins on the pi 1 match the pi2 – they just added extra pins
You might need to enable SPI – it’s disabled on rpi2 by default. Open config.txt on raspberry pi’s SD card and add this line:
dtparam=spi=on
Hi Andrew, great tutorial, clear enough for me to follow if not actually understand!
I’m trying to upload Hyperion to my RPi 2 (with OSMC on) but I get the message “Unable to locate package libprotobuf7”
Any ideas?
Have you enabled SPI?
I have enabled SPI as per Nik’s post above i.e. using
dtparam=spi=on
but I don’t know if that’s had an effect or not.
I have also found elsewhere that the package libprotobuf7 should now be libprotobuf9.
I think I have now installed Hyperion on my Pi2 but I am not certain as it doesn’t appear to be doing anything. Should I be able to see something on my TV screen in OSMC somewhere?
I have tried running
hyperion-remote –priority 50 –color red –duration 5000
and in PuTTY it says:
Connected to localhost:19444
Set color to 255 0 0
but nothing happens with the LEDs.
I am powering the LEDs from a separate power supply delivering 5v/10a so power shouldn’t be an issue?
Seems ok – I am running a pi2 now but decided to give OpenELEC a go and its a piece of cake to install via a script from the hyperion website and your existing config file
Thanks for the helpful instructions! If I plan to keep the power to the strip separate from the power to the Pi, do I still need to wire the GND and 5V GPIO pins to the strip? Or should I just wire the Data and CLK?
Not 5v don’t think the tutorial tells u to do that
Hello,
I want to calibrate the colors. I downloaded the app. Do I need to change all values of each color (rgb)?
For example I wat to calibrate the reds. Do i need to play your video, pause the screen and change all the values of ‘reds’ inside the app? These values I have to change in the config right? I can also ignore the green and blue, because i am changing red?
I also see that the whites are a bit blue when playing content. Wtat part do i need to change to make the whites whiter?
Change things slowly but to get the Reds right you may need to change more than one value
Hello! Awesome tutorial! Im using the latest Rpi2 w/ the latest OSMC build along with hyperion and a ws2801 led strip. My issue is that I have NON STOP flickering… I have ground/clock/data on the correcting pins (9/19/23) I also have a 10a power brick to run the 134 leds. Ive enabled SPI and followed everything exactly… might you know whats going on?? THANKS in advance for your help! P.S. SOMETIMES if I use the hyperion app and do like the fast and slow “rainbow swirl” it wont flicker.. ive tried dozens of different configurations with the hyperion config program to see if random settings would help…..no such luck… I know its NOT the hardware because I tried the same strip on my friend audrino and it did NOT flicker.. THANKS
How long are your cables from pi to LED strip? You can try shortening first and see if it makes a difference. The other thing you can try is a ferrite core over your cables. If you have an old VGA cable you can cut the core out of it and thread it over the cables. Another thing to try then report back how you went!
My cable is about 2 1/2 feet from pi to LED. So basically something funny and unexpected happened… basically as I was about to unplug it all I grabbed all the wires and held them together to move everything around, and I noticed when all the wires were bunched up in my hand, the flickering stopped!! So I had the idea to take a drill and attach the wires to it and basically twisted all the cables together and POOF! MAGIC! It worked and I no longer have any kind of flickering at any intensity!! Thanks for your help! Now on to the next slight issue im having…DARK BLUE, I can only seem to get a CYAN kind of blue, it just changes its brightness, but never actually changes into really different shades and colors in the blue realm…. this could be the limit of the led strip (ws2801)… but not sure! andyone have anything they can share about this? I’ve played around with the hyperion app via IOS and I cant really do anything about it.
I’m also struggling with the flickering problem these days. The easiest way to reproduce it is to use the Hyperion Android app. Just use the color wheel to select a color, then start decreasing the light intensity. In my case the leds seem to work correctly with max intensity, but the more decrease causes more flickering.
Hi Andrew,
Do you know what might cause color intensity/temperature change or dimming along the strip?
I have only 99 leds with 4 L-shaped corner connectors. Power is supplied at the end of the strip (last led), data, clk and GND to RPi is connected to the first led. Voltage level is around 5.25V at the end and still above 5V at the beginning. I also tried to connect 5V and GND to both sides, but that caused some crazy uncontrolled flickering.
Does it matter where the PSU is connected?
Many thanks for this blog!
Sorry not sure on that one my psu is on the left of the arrows on my strip
What i’m doing wrong. My setup is Raspberry pi b+, ws2801 (142 leds), 5VDC 8A. Left upper corner is always different color than oher leds. Like this: https://www.dropbox.com/s/w791p78v9j3ut9m/2015-06-14%2012.09.52.jpg?dl=0
Is that the first led in your run? Picture doesn’t really show anything wrong?
I am using Lightberry. When the led’s need to be white, they are a bit blueish. Do you know which variables I need to change to make them whiter?
“color” :
{
“transform” :
[
{
“id” : “default”,
“leds” : “0-49”,
“hsv” :
{
“saturationGain” : 1.0000,
“valueGain” : 1.0000
},
“red” :
{
“threshold” : 0.0000,
“gamma” : 1.0000,
“blacklevel” : 0.0000,
“whitelevel” : 1.0000
},
“green” :
{
“threshold” : 0.0000,
“gamma” : 1.0000,
“blacklevel” : 0.0000,
“whitelevel” : 1.0000
},
“blue” :
{
“threshold” : 0.0000,
“gamma” : 1.0000,
“blacklevel” : 0.0000,
“whitelevel” : 1.0000
}
}
],
Always difficult – have you tried using the iOS or android app? This allows you to tune on the fly and then you take these values and change the config file
Hi everyone
I know the raspberry is 5v but i WANT use a ws2801 12v led strip with an external power supply +12v can I plug the GND led to GND of the raspberry
the +12v of the light led the 12 power suply (ONLY)
SCLK input CLK (gpio10?) Raspberry
MOSI input DIN (gpio11?) Raspberry
Thanks
Chris
Don’t think so
Hi you use the Hyperion config app to make the config file and then copy it to your Pi. If you are playing you can always use the iOS or android app to change things on the fly to see how it looks before changing config
Thanks for reply, I’ve tried the Hyperion app on my android but after putting the ip address of the pi in I just get ” unable to connect”?
Installed on the raspberry pi 2 is rasbian wheezy with NO raspbmc , is that why the app doesn’t connect? Do I need raspbmc installed?
Kind regards.
No perhaps you haven’t got the port right
I had the flickering problem also on my WS2812b strip. Bright, solid colors were fine, but any time I tried videos or anything dim they would go crazy. I ended up putting a logic-level converter on the RPi data output pin to bring the Pi output up to 5v to drive the LED strip’s data line
Hi there,
i just bought a full ( plug and play ) system ( raspberry pi, lights, splitter etc etc ), all works very very well, however my problem is the over all brightness, i need to dim the lights a bit.
I have no experience in making or setting this unit up as i say it was bought as a ” plug and play”
I’ve been told i need to use the Hyperion Config Tool and change the HSV Value Gain.
I’ve tried logging straight in to the raspberry pi ( usb keyboard plugged in to the pi )
typing: user: pi …. password: raspberry and then
typing in the path: /opt/hyperion/config
which just answered back ( no file or directory found ) ??
My question is basically HOW do i do this?
Do i need to open the Hyperion Config Tool thats on the pi from another computer? or is it all done on the raspberry pi? if its another computer i’m on a mac…
Sorry if this is basic stuff to you guys but its all new to me…
King regards for any help…
I thought the port was the default in the app 19444?
Looks like I’ve been stupid here ha ha
How do I find the port number on the pi?
Sorry for being a pain! Cheers.
Check your config file I think it’s in there
Config file?
Hi again
Hopefully last 2 questions ( thanks for your help so far )
1. So I make a Hyperion config tool and then copy that to the pi, the problem I have is there’s so many settings to change and save and then copy over BUT as I have said I bought a plug and play system that I have not setup myself, so how do I find the settings already used in the Hyperion config tool that’s already been put on the pi? These settings work fine I just want to dim the brightness but if I put a new config file in there with brightness dimmed , without the other settings I’ll wipe the settings I already have, hope I’m clear? Ha ha.
2. Once I have the config file can I put the file on a usb stick, plug it into the pi and from there just copy and paste into the opt/Hyperion/config folder?
Thanks.
You have to know what the hardware is if it is working already without Hyperion configured I’m not sure you are running it through Hyperion
Yes it was bought as a Hyperion setup, and I’ve checked the pi the Hyperion folder is on there.
Also running on the pi is Rasbian Wheezy which I have been told NOT to update, don’t know if this helps?
Have you got your Pi on your network etc
Actually I’ve only had the pi a week and after some testing I’ve now realised the internet lan port isn’t working, so I’m now trying to get a WiFi dongle up and running at the moment with no luck?
hello all I’m having problem lighting up more than 50 leds ws2801 following this guide https://christianmoser.me/how-to-build-your-own-tv-ambilight-with-raspberry-pi-and-xbmc/comment-page-2/ I have tried using a 5v 10amp a 5v 8amp and a 5v 2 amp pi power supply all the same result only 50 leds will light up have tried power strips both ends and in middle but still only 50 ledswill light up any ideas thanks
Hi Andrew, I have a strip of 90 lights set up with an external 5v power supply, but only half of the lights – the 45 closest to the power source – go on. I’ve tried many different configs but I can’t get the other lights to work. Would you know what could be the problem?
Sounds like a config issue still
Hi Andrew, I have a strip of 90 lights set up with an external 5v power supply, but only half of the lights – the 45 closest to the power source – go on. I’ve tried many different configs but I can’t get the other lights to work. Would you know what could be the problem?
How many amps is your psu
I had similar issue mine was a wire and strip issue. Make sure no wires going from led strip and gpio are broken. If you soldered make sure there is no continuity between 5v, si, clock, and ground. Also just double check all your lights are going in the right direction, follow the arrow (seems silly) but double checking the small things usually helps.
hello sir,
i have Raspberry pi 2 can you send the the GPIO where to connect my APA102 led …?
thanks
Rpi2 just has more https://www.google.com.au/search?rlz=1CDGOYI_enAU590AU590&hl=en-US&tbm=isch&sa=1&ei=yp5LVoGAC-LtmQWfooboDA&q=raspberry+pi+2+gpio+differences+to+raspberry+pi+1&oq=raspberry+pi+2+gpio+differences+to+raspberry+pi+1&gs_l=mobile-gws-serp.3…3841.18382.0.19194.18.18.0.0.0.0.976.8575.2-4j3j4j6j1.18.0….0…1c.1.64.mobile-gws-serp..16.2.671.nSZaTPMgGPg#imgrc=GAka6Wi1-dySiM%3A
i have pi 2 B V1.1
Hey AJ
im having a bit of a problem, i am using greatscotts hyperion image, its all setup fine, however i am getting random flickering and it is very annoying, everything is in place perfectly the raspberry pi, everything is grounded perfectly, i have played around with the hypercon file changing baudrate, smoothing and frame grabber according to some other comments but i still get the flickering
wondering if you know of something else i haven’t tried that could be the problem
your help is heaps appreciated 🙂
p.s.you did help me once with the popcorn voltage issue
Hi have you tried shortening leads or a ferrite coil?
Pingback: Lars Jørgensen – Juelsminde | Hyperion Ambilight